Imagine driving down an open road at dusk, when the light is getting dim, and your car’s tail lights are shining brightly. These simple-looking tail lights are an important safety feature that lets drivers behind you know what’s going on. Have you ever thought about the lines that give power to these important parts? In this guide, we’ll get into the world of tail light wiring color codes, taking the mystery out of the seemingly complicated lines and helping you understand what they mean.
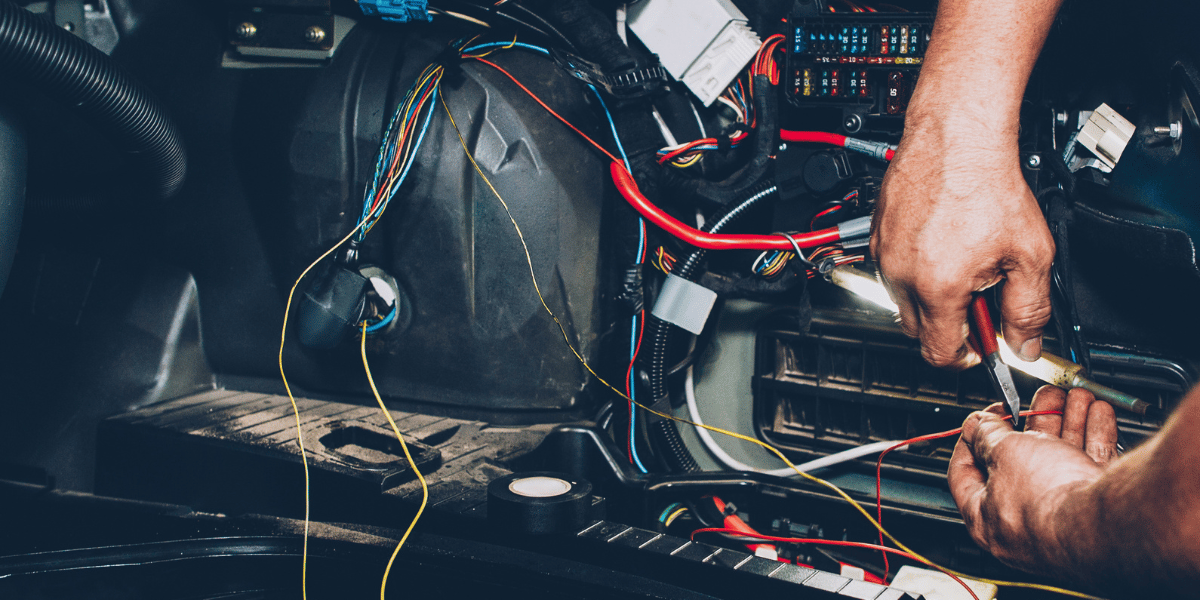
One of the most important safety features on your car is the tail lights. They make you easier for other cars to see, especially at night and in bad weather. If your back lights aren’t working right, it could be very dangerous. One of the most common reasons why tail lights don’t work is because the wiring isn’t right. If your tail lights aren’t working right, you should check the wires for damage or corrosion.
One of the most important things to know about tail light wiring is the color code. The color of each wire corresponds to its function. This makes it easier to identify and repair problems.
Tail Light Wiring Color Codes
The tail light wiring color code is a set of rules for figuring out what each wire in a tail light system does. Most cars have the same color code, but there may be some differences based on the make and type.
Here is a general tail light wiring color code:
- Red: Brake light and turn signal
- Brown: Tail light
- Yellow: Left turn signal
- Green: Right turn signal
- White: Ground
Understanding the Tail Light Wiring Color Codes
- Red: Most of the time, red lines are for the stop and brake lights. When you press the brake pedal, electricity runs through the red wire and lights up the brake lights. This tells drivers behind you that you are slowing down or stopping.
- Brown: The tail lights themselves often use brown lines. When you turn on your headlights or parking lights, the brown line carries the electricity to the tail lights, making your car visible from behind.
- Green: Usually, the right turn signal uses green lines. When you use your right turn signal, the green wire sends the signal to the right rear turn signal light, letting other cars know that you want to turn.
- Yellow: On the other hand, the left turn signal usually uses yellow lines. When you turn on your left turn signal, the yellow wire sends the signal to the left back turn signal light, just like the green wire does.
- White: White wires are for the ground or earth link of the car. They let the electricity flow back to where it came from, finishing the circuit and making sure all the lights work.
This is just a general color code, so keep that in mind. Depending on the make and type of your car, the wires may be a different color. The best way to find the wiring diagram for your car is to look in the owner’s instructions.
Why is the tail light wiring color code important?
The color code for your tail light wiring is important because it makes it easier to figure out what’s wrong with your tail lights and fix them. If your tail lights aren’t working right, you can find the bad wire by looking at the color code. Once you’ve found the bad line, you can start trying to figure out what’s wrong. This could mean changing the bulb or socket or checking the wiring for breaks or rust.
How to use the color code for wiring the tail lights?
To use the color code for tail light wiring, you will need to find the bad line. You can use a voltage gauge to do this. Once you’ve found the bad wire, you can use the color code to figure out what it does.
For example, if the red wire is not working, you know that there is a problem with the brake light and/or turn signal circuit. If the brown wire doesn’t work, you know there’s something wrong with the tail light connection. Once you know what the wire in question is for, you can start to figure out what’s wrong. This could mean changing the bulb or socket or checking the wiring for breaks or rust.
How to use the tail light wiring color code to troubleshoot problems & Fix them?
You will need a voltage tester to use the tail light wiring color code to figure out what’s wrong.
- Find the damaged line. You can do this by checking each wire with the voltage tester to see if it has power. The damaged wire is the one that doesn’t have power.
- Once you’ve found the bad wire, you can use the wiring color code to figure out what it does.
- Once you know what the wire in question is for, you can start to figure out what’s wrong. This could mean changing the bulb or socket or checking the wiring for breaks or rust.
Here are a few specific ways to use the tail light wiring color code to figure out what’s wrong:
- Check the red wire for power if the brake light isn’t working. If the red wire has no power, the problem is either with the cable or with the brake light switch. If the red wire has power, the trouble is probably with the brake light bulb or socket.
- Check the yellow (left turn signal) or green (right turn signal) wire for power if the turn signal isn’t working. If the right wire doesn’t have power, the trouble is either with the wiring or the turn signal switch. If the right wire has power, the trouble is with the turn signal bulb or socket.
- Check the brown line for power if the tail light isn’t working. If the brown line doesn’t have power, the problem is either with the wiring or the tail light switch. If the brown line has power, the problem is probably with the tail light bulb or socket.
If you’re not sure how to fix problems with your tail lights’ wiring, you should always talk to a skilled mechanic.
What are the Common tail light wiring problems and how to fix them?
One of the most common things that can go wrong with tail lights is a blown fuse. To check for a blown fuse, look in your owner’s guidebook for the location of the tail light fuse. If the fuse blows, replace it with another fuse with the same power.
- Wire that is loose or rusty: Wiring that is loose or rusted can also cause tail light problems. Check for breaks or damage in the wires to see if it is loose or corroded. If you find any wire that is loose or corroded, clean the terminals and tighten the connections.
- A bad bulb or socket: A broken bulb or socket can also cause tail light trouble. Replace the bulb to see if it’s the bulb or the socket. If that doesn’t work, it might be the plug. To change the socket, you will need to take off the tail light assembly and disconnect the wiring from the socket. Then you can just take out the socket and put in a new one.
- Wiring that is broken or ruined: If your tail lights’ wiring is broken or damaged, you will have to fix it. To repair the wiring, you will need to take off the tail light assembly and disconnect the wiring from it. Then, just run the new wiring along the same line as the old wiring and connect it to the assembly.
- Bad switch for the tail lights: If the tail light switch isn’t working right, it won’t send power to the tail lights. To find out if your tail light switch is broken, you will need a voltage tester. If the switch doesn’t work right, you’ll have to change it.
It is always preferable to seek advice from a competent mechanic if you are uncomfortable diagnosing or fixing tail light wiring issues on your own.
How to upgrade your tail lights to LED?
To switch to LED tail lights, you need to buy a set of LED tail lights for your car. There are a lot of different brands and types of LED tail lights, so make sure you pick a set that works with your car and looks good.
Once you’ve bought a set of LED tail lights, you’ll have to take the old ones off your car. Depending on the make and type of your car, this process will be different. Most tail lights are held in place by screws or bolts, though. Once you have taken off the old tail lights, you can put on the new LED tail lights.
Just follow the instructions that came with the new LED tail lights to put them on. Most LED tail lights are plug-and-play, so setting them up should be pretty easy. But if you have any questions or problems, make sure to read the instructions or call the tail light maker.
Why you should need to change tail lights to LED?
Here are some of the reasons why you should switch to LED tail lights:
- LED tail lights are brighter than halogen tail lights, so other drivers will be able to see your car better.
- LED tail lights use less power than halogen tail lights, which can save you money on gas.
- Traditional gas tail lights don’t last as long as LED tail lights.
- LED tail lights can make your car look better all around.
If you are feeling uncomfortable to change your car tail lights to LED, Contact with expert to change with better experience.
How to install a trailer light wiring harness?
To install a trailer light wiring harness, you will need the following tools and materials:
- Trailer light wiring harness
- Wire strippers
- Electrical tape
- Heat shrink tubing
- Crimp connectors
- Drill
- Screwdriver
A step-by-step guide
- Find the connector for the trailer light wire harness on your car. Most of the time, this connection is under the back of the car, near the bumper.
- Connect the connector on the trailer light wire harness to the connector on the car.
- Get the wire harness for the trailer lights to the trailer lights.
- Remove the plastic covering from the ends of the wires in the trailer light wiring system.
- Use crimp connections to connect the wires from the trailer light wiring harness to the trailer lights.
- Heat-shrink the crimp connections to seal them and stop corrosion.
- Use zip ties or electrical tape to attach the trailer light wire harness to the car and the trailer.
- Check to see if the trailer’s lights are working right.
The different types of tail light wiring harnesses
There are many different kinds of wiring harnesses for tail lights, and each one serves a different purpose. Here are some of the most popular kinds of wiring harnesses for tail lights:
- OEM wiring harnesses for tail lights: OEM wiring harnesses are the same ones that come with new cars. Most of the time, these harnesses cost the most, but they are also the best and most durable.
- Universal tail light wiring harnesses: Universal tail light wiring harnesses are made to work with any car. Most of the time, these straps are the least expensive, but they may need to be changed to fit.
- Aftermarket tail light wiring harnesses: Aftermarket tail light wiring harnesses are made to work with a wide range of cars. Most of the time, these harnesses cost less than OEM harnesses, but they may not be as good or durable.
- Wiring harnesses: Wiring harnesses for trailer lights are made to connect the trailer lights to the electrical system of the car. Most of the time, these devices are easy to set up and use.
Third brake light wire harnesses are made to connect the third brake light to the vehicle’s electrical system. Most of the time, these devices are easy to set up and use.
How to choose the right tail light wiring harness for your vehicle?
When picking a tail light wiring harness, you should think about the following:
- Compatibility: Make sure that the wiring harness you choose will work with your car and any other items you may want to add.
- Quality: Original equipment manufacturer (OEM) wire harnesses are usually the best, but aftermarket and universal harnesses can also be good. Before you buy, make sure to read reviews of different names and models.
- Price: The price of a tail light wire harness can be anywhere from $20 to $200. Pick a harness that fits your wants and your budget.
- Installation ease: Some wire harnesses are easier to put together than others. If you don’t know much about wiring, choose a harness that is easy to put together.
If you aren’t sure what kind of tail light wiring harness you need, you should always talk to an experienced mechanic.
How to test a wire harness for a tail light?
To test a tail light wire harness, you’ll need a voltage tester and follow the simple steps.
- Disconnect the wire harness from the tail lights.
- Change the voltage tester to measure DC volts.
- Touch the power wire on the cable harness with the positive end of the voltage tester.
- Put the negative end of the voltage tester on the vehicle’s ground.
- If the voltage tester shows 12 volts, the power wire is working correctly.
- Repeat steps 3 through 5 for each of the other wires on the cable harness.
- If there is no power to any of the wires, the wiring harness is broken and needs to be changed.
How to fix a wire harness for a tail light by yourself?
You will need the following tools and parts to fix a tail light wire harness:
- Strippers for wire
- Tape for wiring
- Heat-shrinkable tube
- Connectors you crimp
- Find the damaged part of the wiring harness.
- Cut out the broken part of the wire harness.
- Remove the covering from the ends of the wires.
- Connect the wires with crimp plugs.
- Heat-shrink the crimp connections to seal them and stop corrosion.
- Wrap the mended wire harness with electrical tape.
How to keep a tail light wiring harness in good shape?
To keep a tail light wire harness in good shape, you should check it often for signs of damage and wear. If you find any broken wires, you should fix them right away. You should also clean the terminals on the wire harness often to stop corrosion.
Safety tips for working with tail light wires
- Before working on any wiring, you should always separate the negative cable from the battery.
- When working with sharp tools, like wire cleaners, be careful.
- Don’t work on electrical wires when it’s wet or humid.
- If you’re not sure how to work with electrical wires, it’s best to talk to a professional mechanic.
- Wear safety glasses and gloves to protect yourself from electrical shocks and cuts.
- Whenever you can, use tools with insulation.
- Be aware of your surroundings and don’t work on the wires for your tail lights in places where you could get hit by a car or other dangers.
If you follow these safety tips, you can test, fix, and keep your tail light wiring connection in a safe and effective way.
The Elegance of Stop/Turn Tail Light Wiring Diagram
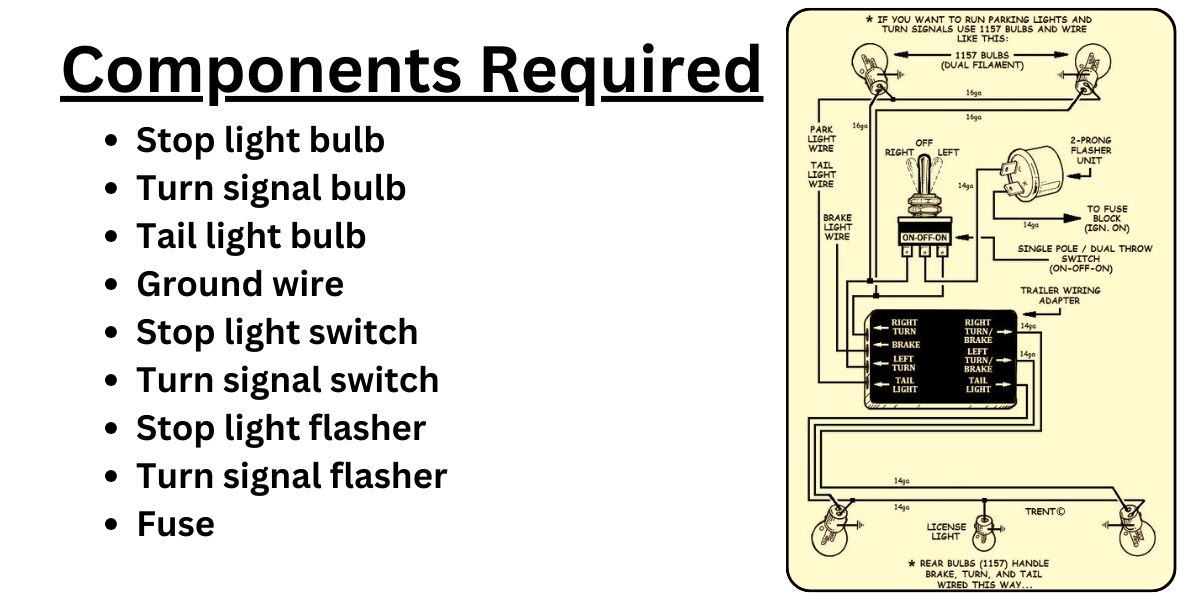
Connections:
- The stop light bulb is connected to the stop light switch and the stop light flasher.
- The turn signal bulb is connected to the turn signal switch and the turn signal flasher.
- The tail light bulb is connected to the tail light switch.
- The ground wire is connected to the metal chassis of the vehicle.
- The stop light switch is connected to the brake pedal.
- The turn signal switch is located on the steering column.
- The stop light flasher and the turn signal flasher are located under the dashboard.
- The fuse is located in the fuse box.
Operation:
When the brake pedal is pressed, the stop light switch closes and sends power to the stop light bulb. This causes the stop light bulb to illuminate.
When the turn signal switch is activated, the turn signal flasher sends power to the turn signal bulb on the appropriate side of the vehicle. This causes the turn signal bulb to flash.
The tail light bulb is illuminated whenever the headlights are turned on.
Troubleshooting:
If the stop light is not working, check the following:
- The stop light bulb
- The stop light switch
- The stop light flasher
- The fuse
If the turn signal is not working, check the following:
- The turn signal bulb
- The turn signal switch
- The turn signal flasher
- The fuse
If the tail light is not working, check the following:
- The tail light bulb
- The tail light switch
- The fuse
If you are not comfortable troubleshooting electrical problems, it is best to consult with a qualified mechanic.
Frequently Asked Questions (FAQs)
Q: What is the tail light wiring color code?
A: The tail light wiring color code is a standardized system that assigns specific colors to wires in your vehicle’s tail light system, making it easier to identify their functions.
Q: Is the tail light wiring color code consistent across all vehicles?
A: While the general color code remains consistent, there can be variations depending on the make and model of your vehicle. Always consult your owner’s manual or specific wiring diagrams for accurate information.
Q: What are the factory tail light wiring color codes for Chevy trucks?
A: Factory tail light wiring color codes for Chevy trucks may vary, but common colors include red for brake lights, brown for tail lights, and green/yellow for turn signals.
Q: What are the common colors for Ford tail light wiring?
A: Common Ford tail light wiring color codes include red for brake lights, brown for tail lights, and green/yellow for turn signals.
Q: How can I test my tail light wires to ensure they are functioning correctly?
A: To test tail light wires, use a voltage tester to check for power in each wire. If a wire lacks power, it may indicate an issue in that section of the wiring.
Q: Are colored tail lights illegal?
A: The legality of colored tail lights varies by location and regulations. Check your local laws to determine whether colored tail lights are permitted.
Q: How do I wire LED tail lights with three wires?
A: Wiring LED tail lights with three wires typically involves connecting the wires according to the manufacturer’s instructions. These wires are usually for power, ground, and a specific function like turn signals or brake lights.
Q: What color is the brake light wire in the tail light wiring color code?
A: In the tail light wiring color code, the brake light wire is typically red.
Q: How do I check my tail light wiring for damage or issues?
A: To check your tail light wiring for damage or issues, visually inspect the wires for breaks, corrosion, or loose connections. Use a voltage tester to identify any non-functioning wires.
Q: How can I identify wire colors in my tail light wiring?
A: You can identify wire colors in your tail light wiring using a wiring diagram specific to your vehicle or by referring to the standardized color code for common functions.
Q: What Color are Rear Lights?
A: Rear lights on most vehicles are typically red. This includes tail lights, brake lights, and rear turn signal lights. The color red is widely used to indicate braking and signaling actions to drivers behind your vehicle.
Q: What are the 3 Wires to a Tail Light?
A: The three wires to a tail light represent different functions: red for brake lights, brown for tail lights, and green/yellow for turn signals.
Q: What are the 4 Wires to a Tail Light?
A: If there are four wires to a tail light, the additional wire is often used for reverse lights, indicating when the vehicle is moving backward.
Q: What is the 4-Pin Tail Light Wiring Color Code?
A: The 4-pin tail light wiring color code specifies the colors used for four wires in the tail light system, typically including functions like brake lights, tail lights, turn signals, and ground.
Q: Why is it important to know the color code for connecting the tail lights?
A: The color code for the tail light wires is important because it makes it easier to figure out what’s wrong with the tail lights and fix them. If you know the color code, you can quickly find the problem line and take the right steps to fix it.
Q: What are some common mistakes to avoid when trying to figure out what’s wrong with your tail lights?
A: When fixing tail light wiring problems, it’s important not to make the following mistakes:
- Not using the right kind of voltage tester.
- Not being able to find the bad line.
- Not using the right heat shrink tubes or crimp connectors.
- Not following the directions that came with the tail lights or the wire harness.
- Not checking the tail lights after repairs to make sure they are still working.
Q: What are some safety steps to take when fixing wiring problems in the tail lights?
A: When fixing tail light wiring problems, you should do the following things to stay safe:
- Before working on any wiring, you should always separate the negative cable from the battery.
- When working with sharp tools, like wire cleaners, be careful.
- Don’t work on electrical wires when it’s wet or humid.
- Wear safety glasses and gloves to protect yourself from electrical shocks and cuts.
- Whenever you can, use tools with insulation.
- Be aware of your surroundings and don’t work on the wires for your tail lights in places where you could get hit by a car or other dangers.
Q: Where can I learn more about color codes and repair for tail light wiring?
A: You can find a lot of information online and in libraries about tail light wiring color codes and how to fix problems with them. You can also look in the owner’s guidebook for your car for more information about how the wiring system for the tail lights works.
Conclusion
Car owners must know the color code for fixing the tail lights. It helps find problems with tail lights and keep them in good shape. Each wire color stands for a certain purpose, which makes sure that everything works right. Even though there may be differences, this information makes trips safer and more reliable. Keep your taillights bright and drive with confidence, knowing that you can fix wiring problems if they come up.